Sunday, December 30, 2012

Flint Crepe Company

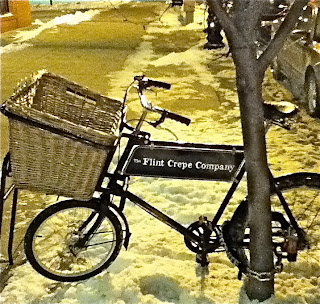
    My family took a trip back "home" to Flint, Michigan for the holidays and were eager to try out the Flint Crepe Company in downtown. We heard many good things about this restaurant and wanted to see if it would live up to the hype. 

   We were not disappointed! The crepes were delicious! I was thrilled that my crepe was thin and slightly crispy (I can't stand pancake-like crepes). There was also a generous portion size of the filling, which made me happy! I was instantly addicted and wanted to order a second one! 

   I apologize for the poor quality pictures. It was late at night (just before closing) and all I had with me was my iPod.


   While searching the Internet for a website for the Crepe Company that I could post a link too (they don't have one), I stumbled across some rather entertaining reviews of the restaurant. Some common complaints listed were the prices of the food and the poor customer service. I found these complaints particularly amusing seeing that we are coming from the land of uninterested hipsters (aka Northampton) and overpriced food. We thought the food was reasonably priced and the service was decent, so don't let these reviews discourage you. The food was worth the trip. 

   What was more important for me to see was something positive happening in Flint. Flint has a special place in my heart and I'll never stop loving it. I give credit where credit is due. I applaud the people who have stayed in the city and are trying to successfully run their businesses and make a positive change. Happy Holidays Flint! I celebrate your successes!

   Check out the Flint Crepe Company's Facebook page at https://www.facebook.com/FlintCrepe.

Yellow weather ball at night.

Monday, December 10, 2012

Homemade Christmas Ornaments/Recipe for Salt Dough Ornaments

   All of last week, I was chomping at the bit at work for the weekend. I couldn't wait to be home with my family! I had big plans to make homemade Christmas ornaments all weekend with my child and I wanted to get started ASAP!

   I couldn't be more pleased with the way that they turned out! Just like cards, ornaments are more special to me when I know little hands have worked hard on creating them. All I see is the beauty and goodness in something when I know it comes from a place of love!

   Anyhow, if you have any questions about the way that any of these are made, please comment your question on either the Blogger website or my Facebook page. They're very easy and pretty self-explanatory. The most important item you will need for all of them is a GLUE GUN. If you are a mom and you don't own a glue gun, you need to run to the store right now (Michael's, Jo-Ann's, Hobby Lobby, etc.) and buy yourself one! You won't regret it! The glue gun has a been a life saver for me, not only for crafts but for many other magical mom tricks such as: fixing toys, patching holes so that ants don't get into your house, fixing the soles of shoes, its uses are endless! I also used a lot of popsicle sticks. These are good to have around the house too! If you are curious about what craft supplies might be handy to have at home, please refer to my older post on Art at Home


   Another fun Christmas activity to do with your kids is making salt dough ornaments. I'm not sure how long lasting they are, but they are fun to make and decorate. If you HAVE to throw them out, at least you'll know that you didn't spend a lot of them AND you can have fun making them again next year! I've seen lots of variations of this recipe, but here's the recipe that I followed.

Salt Dough Ornaments

You will need:

2 cups flour
1 cup salt
3/4 cup warm water
Cookie cutters
Straw
Cooking spray
Paint, glitter, etc. to decorate
String


1. Preheat over to 225 degrees.
2. Mix flour and salt. Add water. Knead until soft (if dry, add more water).

3. Roll dough on floured surface to 1/4-inch thick. 

Cut with cutters. Add hole at top with straw. Put shapes on sprayed cookie sheet and bake 2 to 4 hours until hard, flipping every 45 minutes.
 4. Let cool completely. Decorate. Tie ribbon through hole.


To see my recipe for Cinnamon Cut Out Ornaments, click here.

Sources of inspiration:  http://www.usmagazine.com/celebrity-news/news/tori-spellings-kid-friendly-holiday-entertaining-tips-2012512, http://www.misseberhartsclass.com/christmas_ornaments.htm, http://www.thecraftycrow.net/2008/12/popsicle-stic-2.html.

Sunday, December 9, 2012

Handprint Santa Christmas Card

   Lately, I’ve been obsessed with homemade cards. They mean so much more to me than regular cards. Cards are more special when they are made with love! While researching homemade card ideas, I came across this little gem and had to recreate it with my child! It’s really easy and adorable!

You will need:

Paper
Red Paint
White Paint
Paint Brush
Peach or a Flesh Colored Paint
Marker
Cotton
Glue
Googly Eyes (optional)
Red Glitter Glue (optional)

Directions:

1. Fold your paper in half to make a card.
2. Take your child’s hand and paint the fingers (excluding the thumb) and top half of the palm with the white paint.
3. Paint the lower part of the palm and the thumb with the red paint.
4. Carefully place your child’s hand on the paper and push down on it.

 5. Let the paint completely dry.
6. Paint the peach or flesh color in the middle of the palm on the print. This will be Santa’s face. Let it dry.
7. Once dry, glue the cotton along the bottom of the hat and at the tip.
8. Use the marker to draw the nose, mouth, and words on the card.
9. Glue the googly eyes on the face.
10. Add glitter glue to the words.


 To see my source of inspiration, go to http://suite101.com/article/handprint-art-handprint-christmas-card-craft-and-poems-for-presc-a318806. 


Saturday, December 8, 2012

Buckeyes

Ingredients

3 cups confectioners’ sugar


1 cup creamy peanut butter

4 tablespoons (1/2 stick) butter, at room temperature or softened in microwave
 (who has time to let it sit!)
1 teaspoon vanilla extract

3 cups semisweet chocolate chips

Directions
1. Line a baking sheet with parchment paper.
2. In a bowl, beat together the sugar, peanut butter, butter, and vanilla (or you can mix it with your hands). The dough should end up slightly crumbly.
3. Roll the dough into 1-inch balls. Place the balls on the prepared baking sheet and stick a toothpick into each ball.

4. Place in the freezer and chill for 1 hour.
5. In a double boiler, or in a bowl snugly on top of a pan with a few inches of simmering water, melt the chocolate chips, stirring until smooth.

6. Holding a ball by the toothpick, dip it into the hot chocolate, leaving a small hole of the peanut butter dough showing at the top of the ball as the “buckeye.” Let the excess chocolate drip back into the pot. Put the buckeye to the baking sheet. Repeat with the remaining balls.
7. Cover loosely with plastic wrap and refrigerate.

8. Enjoy the delicious buckeyes with a nice glass of milk! Yum!