Pinatas are a fun and festive game for any party! Who wouldn’t love lining up to take a swing at a big hanging object that is going to explode and give them candy? Sounds like fun to me! But pinatas can be so expensive! Not only do you have to buy the candy and prizes for the inside, but the pinata itself can run you anywhere between $12-$30+. Well not anymore! You’re going to learn how to make your own pinata and WOW your party guests with how crafty you are!
Things you will need:
A Balloon
Newspaper
Flour
Water
Bowl
Crepe Paper (for decorating it)
Construction Paper (for decorating it)
Glue (craft or Elmer’s type glue)
Directions:
1. Blow up your balloon to the desired size.
2. Make your paste mixture with the flour and water. The measurements should be 2 parts water to 1 part flour. For example, for a regular size balloon, I used a half cup of flour and one cup of water (I didn’t add the full amount of water because it was looking too runny, so my actual measurement may have fallen just short of 1 cup).
3. Tear or cut the newspaper into small rectangles (about 1 1/2 x 3 inches). Now you have your supplies.

4. Place your balloon in a bowl to hold it. Dip your newspaper rectangles into the paste squeezing off the access liquid with your fingers and smooth it out on the balloon. Do this until you’ve covered almost the entire balloon. Leave a hole or bare spot around where the balloon is tied (this will be the hole where you put the candy in once you pop the balloon).


5. Wait for the newspaper paper mache (or “Papier-Mache”) layer to dry completely (I waited about 2 days in between layers) and repeat steps 2-4. You will want about 3-5 layers depending on how strong you want the pinata to be and how much candy it will be holding.
6. Once you’ve completed all of your layers and they are completely dry, pop the balloon. You now have the basic shell of your pinata.
There are many different ways you can decorate or shape your pinata. I’ve seen people turn it into a horse or donkey by gluing on toilet paper holders and empty boxes. In my case, I was making a pumpkin so all I needed was orange crepe paper and some construction paper. To add the crepe paper, simply add a line of glue to the top of it and spiral it around the balloon. Once I completed this, I added some construction paper for the face of the pumpkin. Then I punched two holes on either side of the candy hole and strung a ribbon through it so that the pinata could hang. Then I added some construction paper leaves and a stem to cover up the candy hole.

Some helpful tips:
1. Make sure you make the pinata somewhere that you won’t mind getting messy. The first time I attempted this, I was making it in my kitchen and the balloon popped while I was adding my first layer. The explosion got the white paste all over my kitchen cabinets and ceiling! After that, I decided to move everything down into the basement.
2. To make the string holes stronger, I added a piece of packing tape on both the outside and inside of the balloon shell before I punched the holes. This seemed to help the holes not to rip.
I once had my balloon pop between layers 1 and 2 while it was drying overnight (I think one of my cats may have been trying to play with it). This caused a big tear in my paper mache layer. I thought I was going to have to throw it out, but I was able to save it by putting a piece of packing tape on the inside of the shell, blowing up another balloon inside of the shell, and covering the rip with more paper mache. I then continued to make my paper mache layers.
3. This video http://video.about.com/familycrafts/How-to-Make-a-Pinata.htm is a great resource for making your pinata, especially to see how the crepe paper decorating can be done.
One of my favorite parts of Halloween is baking all of the pumpkin seeds I get from carving my pumpkin. When cooked properly, these crunchy, salty seeds can be quite addicting! Here's a simple recipe on how to make your seeds a tasty hit with any crowd!
You'll need:
A Pumpkin
Butter (or margarine)
Salt
Directions:
1. Preheat your oven to 330 degrees.
2. Carve a hole at the top of your pumpkin to remove the insides.
3. Separate the seeds from the "guts."
4. Melt 1 stick of Margarine (or butter) in a glass measuring cup or bowl in the microwave until it is melted. Remove it about every 15 seconds to stir. (NOTE: You may need more butter depending on how many seeds you have. I use this amount for the seeds from 1-2 giant pumpkins.)
5. Pour the butter into the bowl of seeds and stir well.
6. Measure 1 Tablespoon of salt and pour into the bowl of seeds and stir well. (NOTE: Again, you may need to adjust how much you use depending on how many seeds you have and how salty you want them.)
7. Pour the bowl of seeds onto a baking sheet and spread them out so that they are all mostly flat on the sheet.
8. Bake for about 55 minutes.
A few extra tips:
1. We also included the seeds from a butternut squash we had used for making soup from the day before. These seeds are much smaller and harder to separate, but they turn out very tasty and can be used to add some crunch to your soup.
2. Another tasty seasoning to add to your seeds once they are on the baking sheet is Lawry's Seasoned Salt. Yum!
Fall is my favorite time of the year! I love breaking out the warm sweaters and cute coats in preparation of the cooler weather, watching the leaves on the trees change color and fall to the ground, putting out Halloween and fall harvest theme decorations around the house, but best of all, visiting apple orchards! Growing up in Michigan, apple orchards were a must on the list of "places to visit" in the fall. Each orchard would host an "Apple Festival" on one of the weekends in September or October where families could go apple picking, take a hay ride, shop craft booths, pet farm animals, make jump ropes, look at old farming equipment, pick out pumpkins, watch how apple cider was made and eat delicious food! You could indulge in all sorts of tasty treats such as hot dogs, bean soup, popcorn, candy sticks, caramel apples, apple cider, and best of all, hot, crisp, fresh out of the oven, apple cider donuts! These donuts were amazing! Nothing was as crunchy or delicious as these donuts! Just thinking about fall makes my mouth water for donuts! Anyway (I got a little off track thinking about the donuts), when we moved to western Massachusetts, we were bummed to learn that apples and apple festivals weren't really the thing around here. Blueberries and blueberry picking are more popular. It was devastating for a Michigan transplant! Fortunately, after some research, I was able to find a charming little orchard along Route 66 in Westhampton that made me feel like I was back in my home state.


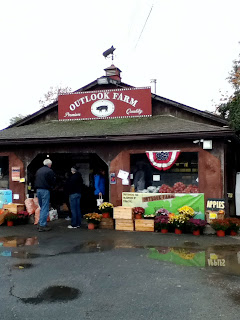
Outlook farm hosts two festivals in the fall: an apple festival in September and a pumpkin festival in October. Both festivals feature a hay ride, apple picking, and tons of delicious food such as soup, sandwiches, apple cider, donuts, candy sticks, and a pig roast and barbecue. While the donuts aren't quite as fresh and crisp as what we're used to back home (I'm telling you, those donuts are hard to beat!), Outlook has amazing cookies! The molasses spice cookies are to die for! Outlook is a wonderful place to take the family in the fall and and the festivals are a fun, annual event to look forward too. It makes transplants like us feel at home! This year, unfortunately, it was raining during the pumpkin festival so my pictures aren't that great, but we still had a great time and I think you'll get the idea!


For more information about Outlook Farm, visit http://outlook-farm.com/index.html. To visit some of my favorite orchards in Michigan, go to Spicers in Fenton http://www.spicerorchards.com/, Wolcott Orchards in Flint http://www.wolcottorchards.net/, or Almar Orchards in Flushing http://www.almarorchards.com/.
And now a few words about digital photography... You may be surprised to learn that I made the switch to digital photography only a few years ago (back in 2008). When my father closed his photography studio, we bought his camera and have used it every since. In that amount of time, I've probably had to learn at least a dozen different programs for altering my pictures. I've also recently switched from a PC to a MAC, so I'm still navigating those changes (which explains part of the reason for my long gaps in posts). There have been things about each picture program that I have loved and things that I have hated, but I'm always excited and willing to learn new things and improve where I can. Still, I admit, sometimes I miss film. I took a black and white photography class in college and I fell in love with the process of developing film! My friend and I were very close to investing in the equipment to create our own darkroom, but I moved out of the state shortly after the class so there was no way we could do it. There's something very real and pure about film but I love having the ability to improve my art. I just can't help myself when it comes to playing with my pictures. While I don't believe in perfection, I like making something that I see in my mind come to life in a photograph and being able alter it until it is close to perfect (brightening a color here, removing a blemish there). Anyhow, I hope you will and have enjoyed my photographs. I wish I could dedicate more time to taking them, but I also believe in everything in moderation and finding a balance in life. Thank you for reading!


